Scene Authoring and Voxel Scene Editor
This guide explains how to prepare a voxel scene for Voxel Playground, import it into the Mod Toolkit, and use the Mod Toolkit version of Voxel Scene Editor to adjust scene object types and generate door hinges.
Tool path in the Mod Toolkit: Vox Mod Tools > Voxel Scene Editor
The Mod Toolkit version of Voxel Scene Editor contains two tabs:
- Type Switch changes imported voxel objects between the A, B, C, and D scene types.
- Door Generator configures one or more voxel objects as hinged doors.
1. Split the Scene Into A, B, C, and D Objects
Build large scenes as multiple objects in the MagicaVoxel World Editor. Give every object a unique name and use an A_, B_, C_, or D_ prefix to describe how it should behave in the game.
The prefix is not only a naming convention. When a .vox scene is converted, the importer uses it to configure the generated VoxelObjectProxy, physics state, entity type, layer, and connection helpers.
| Prefix | Type | Use for | Imported behavior |
|---|---|---|---|
A_ |
Static | Ground, roads, walls, and permanent structural geometry | Static SceneStatic object on the Building layer, tagged Floor, with a kinematic RigidbodyProxy. It is not destructible. |
B_ |
Dynamic | Crates, barriers, loose props, and debris | Destructible SceneDynamic object on the Item layer with dynamic physics. It can move freely after the scene loads. |
C_ |
Strong Connected | Destructible buildings or large objects that must remain supported by the environment | Destructible SceneStrongConnected object on the Item layer. An UnyieldingArea is added to keep connected voxels supported while the area overlaps the environment. |
D_ |
Weak Connected | Hanging signs, lamps, doors, and other objects attached through a breakable joint | Destructible SceneWeakConnected object on the Item layer. An AttachmentPoint and environment joint data are added so it can connect to nearby scene geometry. |
Choosing the Correct Type
Use these questions when splitting a scene:
- Must this object always remain fixed and act as part of the floor or environment? Use
A_. - Should it fall, roll, or be pushed without being anchored? Use
B_. - Should it be destructible but remain firmly supported until its connection to the environment is broken? Use
C_. - Should it hang from, hinge on, or weakly attach to another object? Use
D_.
For example, a small building scene could contain:
A_Ground
A_Foundation
C_WallNorth
C_WallSouth
B_Table
B_Crate
D_HangingSign
Important Naming Rules
- Put the prefix at the beginning of the MagicaVoxel object name.
- Use an underscore after the letter, such as
C_Tower, notCTower. - Give every object in the
.voxfile a unique name. Duplicate names are renamed during conversion and make later updates harder to track. - Objects without an A/B/C/D prefix are imported as static scene objects, but they are not configured exactly like an explicit
A_floor object. Prefix every scene object to make its intended behavior clear.
2. Import the Scene
- Open
Vox Mod Tools > Assets Processor. - Add the source
.voxfile. - Set Type to Scene.
- Click Convert.
- Open the generated prefab and check that the scene hierarchy, transforms, and object types match the MagicaVoxel World scene.
Each generated voxel object should have a VoxelObjectProxy. Voxel Scene Editor only operates on objects that belong to a VoxelObjectProxy, so select the generated voxel object or one of its children when using the tool.
3. Open Voxel Scene Editor
Open Vox Mod Tools > Voxel Scene Editor in the Mod Toolkit.
The Mod Toolkit window intentionally exposes only Type Switch and Door Generator. Tabs found in the full game project, such as Merge, Seats, Batch Select, and Settings, are not part of the Mod Toolkit workflow.
4. Type Switch
Use Type Switch when an imported object has the wrong prefix or when you want to change its behavior without returning to MagicaVoxel and converting the entire scene again.
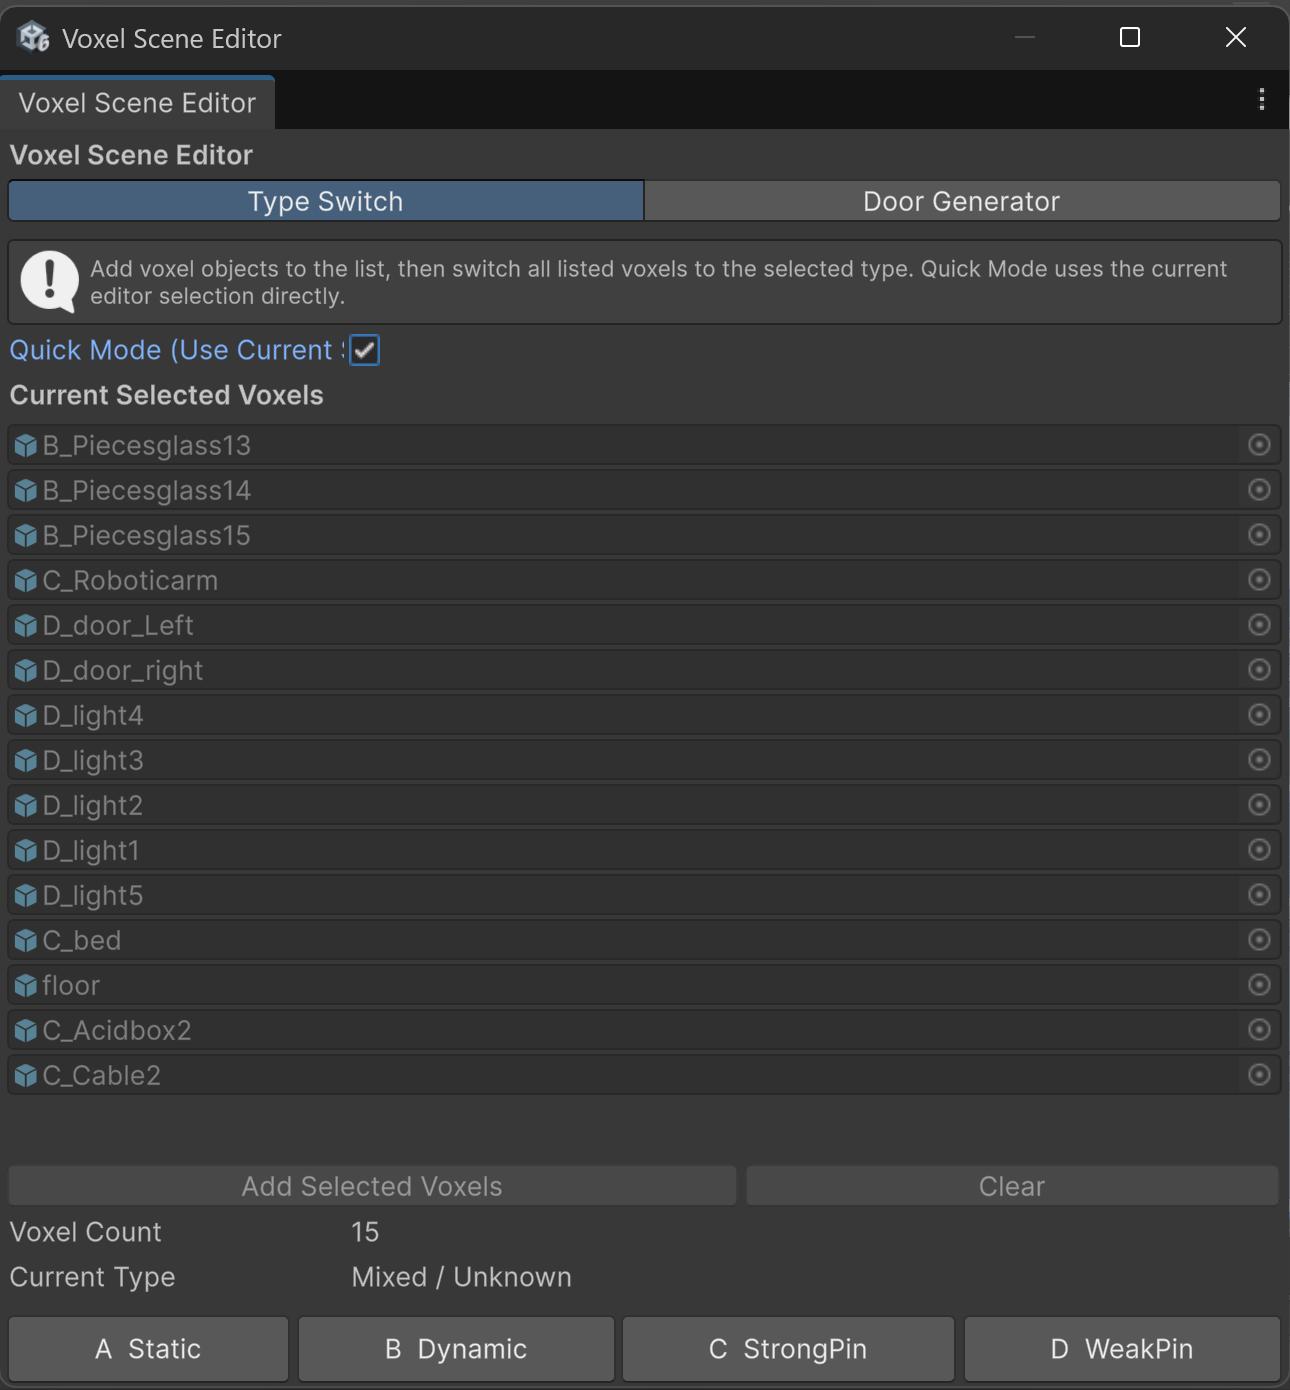
Select Targets
There are two ways to provide voxel objects to the tool:
- Leave Quick Mode disabled, drag objects into the target list, or use Add Selected Voxels.
- Enable Quick Mode (Use Current Selection) to process the current Unity selection directly.
Quick Mode is useful for one-time edits. The target list is safer when you need to keep the same group selected while inspecting other objects.
The window reports the number of valid voxel objects and their shared current type. If the selected objects have different types, Current Type is shown as mixed or unknown, but pressing a type button still applies that type to every valid target.
Switch Object Type
Press the button for the target type. The operation updates both the object name prefix and its Mod Toolkit authoring setup, including VoxelObjectProxy.proxyType, the physics state, the entity component, the layer and tag, and any type-specific helper objects.
Changing away from C removes its UnyieldingArea. Changing away from D removes its AttachmentPoint objects. Check any manually customized connection helpers before changing an existing object to another type. The operation supports Unity Undo.
Configure C StrongPin Supports
When all active targets are C objects, the tool displays Add 4 Corner Supports.
Use this for large buildings whose support should be distributed around their base instead of relying on a single central UnyieldingArea. The tool places support areas near the four bottom corners of the solid voxel bounds.
The pin works only when the support area overlaps valid Building-layer environment geometry. After generating the supports:
- Inspect every
UnyieldingAreain the Scene view. - Confirm that each support intersects the intended
A_ground or foundation. - Move or resize a support if it misses the structure because of an unusual footprint.
Configure D WeakPin Attachment Points
When all active targets are D objects, the tool displays attachment-point controls.
Use Up, Down, Right, Left, Front, or Back to move the D object's AttachmentPoint to the center of the selected solid voxel face. The selected face also determines the attachment direction shown by the yellow Scene view gizmo.
Use Snap To Wall when the object is already close to the surface it should attach to. The tool searches nearby scene voxel objects, moves the attachment point to the closest suitable wall position, and orients the enabled attachment direction toward that wall.
For reliable snapping:
- Place the D object close to the intended surface before running the command.
- Make sure the target wall is an imported voxel object in the current scene or prefab stage.
- Keep the intended wall within approximately 1.5 Unity units of the attachment search area.
- Inspect the yellow arrow after snapping. It should point from the attachment point toward the supporting surface.
5. Door Generator
Use Door Generator to convert voxel objects into D-type weak-connected objects and configure their hinge attachment data.
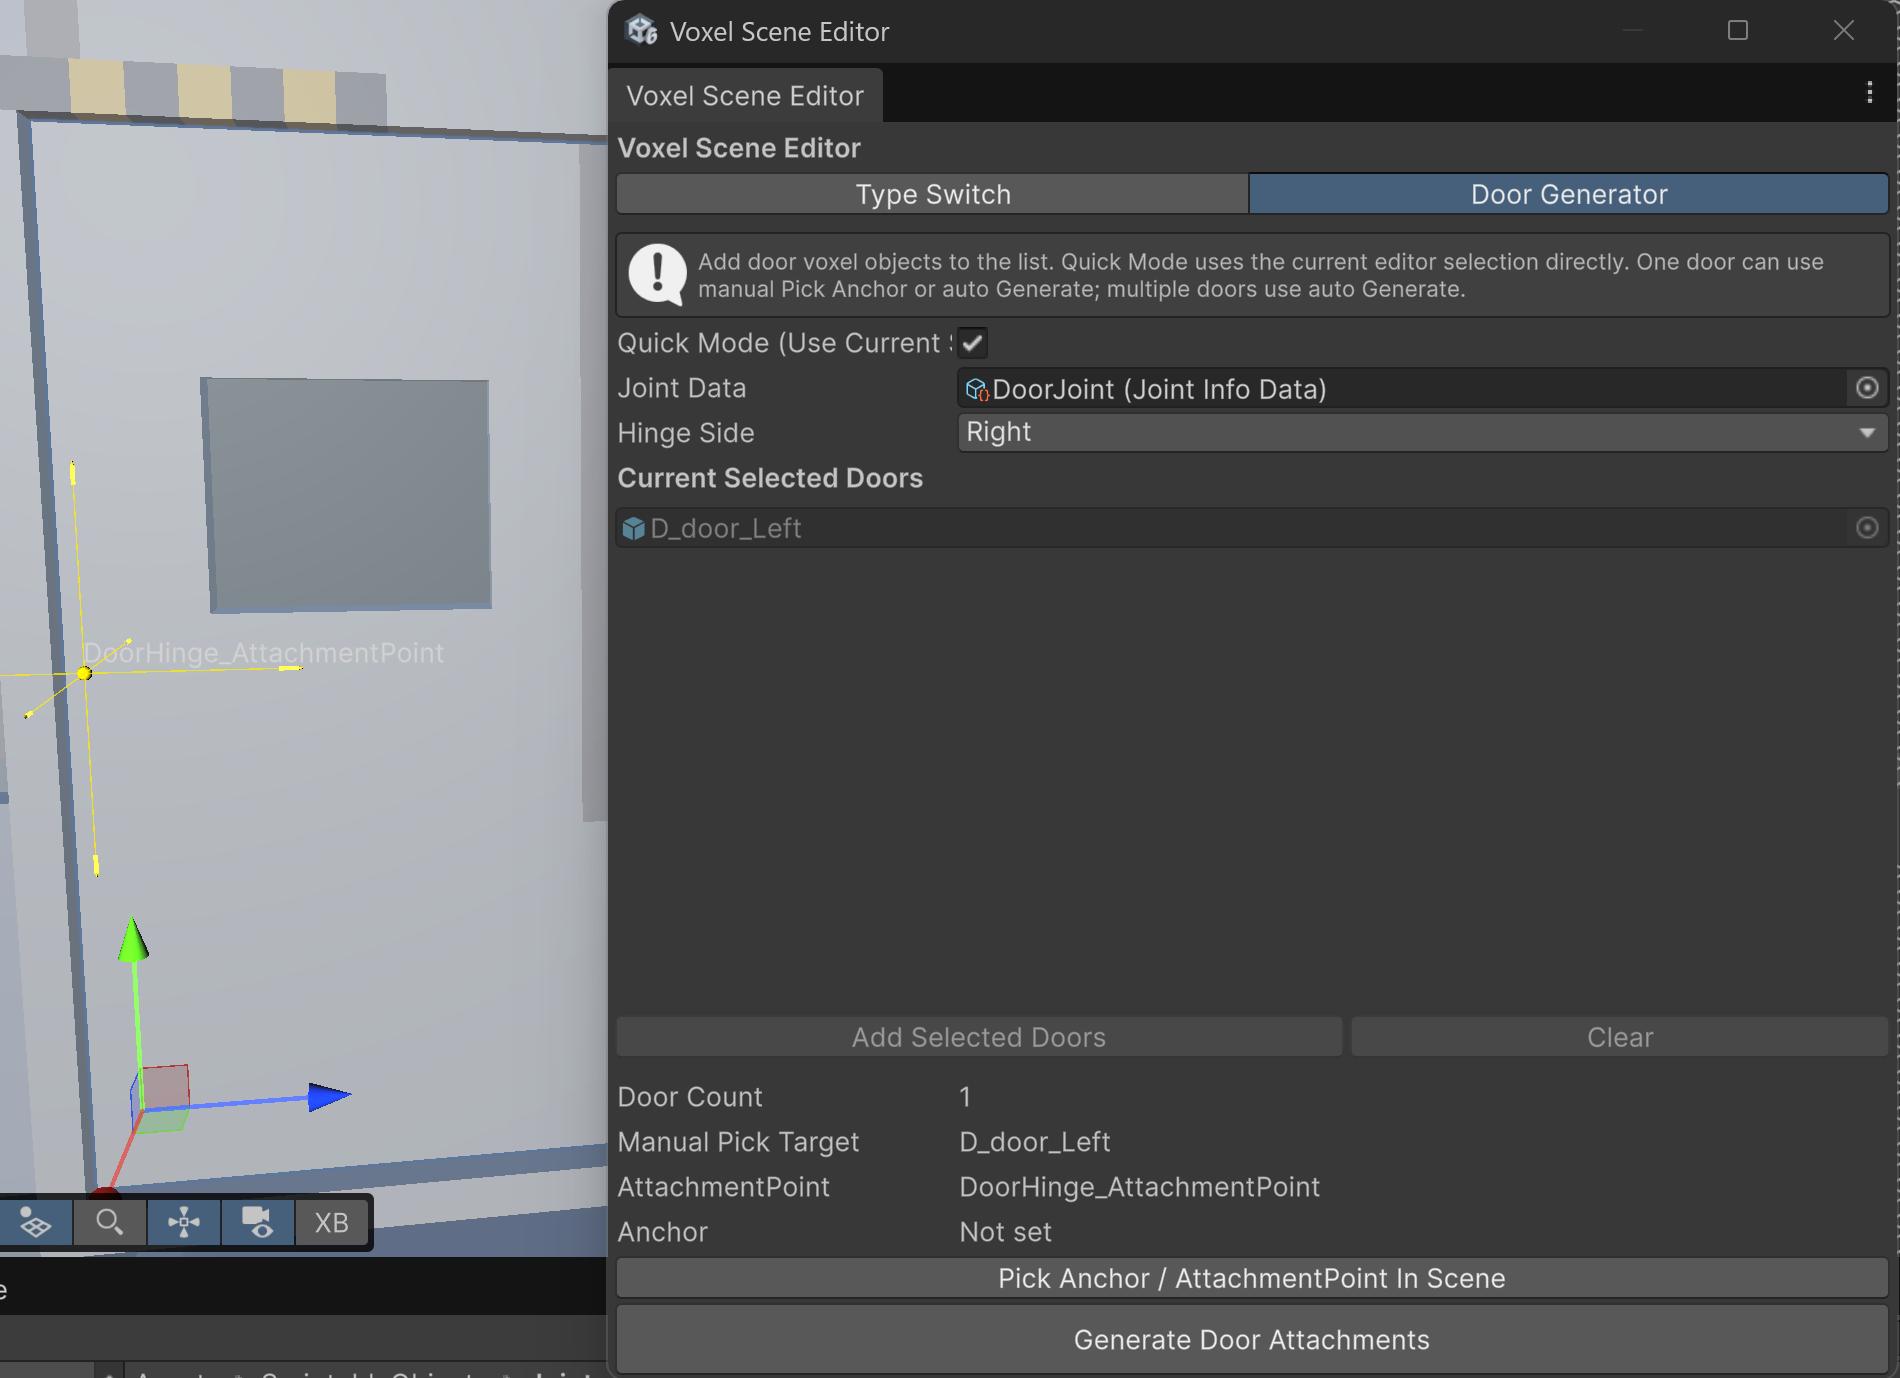
Prepare the Door
Before generating a hinge:
- Import or create the door as a separate voxel object.
- Place the door at its final position and rotation.
- Make sure its solid voxel shape reaches the intended hinge edge.
- Select a
JointInfoDataasset whose joint type is HingeJoint.
The generator accepts other joint data, but it logs a warning when the selected asset is not configured as a hinge. Use hinge joint data for predictable door behavior.
Select Doors
As in Type Switch, you can drag doors into the list or enable Quick Mode (Use Current Selection).
- With exactly one door, you can pick the hinge anchor manually or use automatic generation.
- With multiple doors, use Generate Door Attachments to process the whole group automatically.
Set Hinge Side
Choose one of the following Hinge Side options before automatic generation:
- Left places the hinge on the negative side of the door's widest horizontal axis.
- Right places it on the positive side of the door's widest horizontal axis.
- Auto Closest Building compares both sides and chooses the side closest to an A-type or Building-layer voxel object.
Left and Right are based on the door object's local axes. If the result appears reversed, check the door transform and local orientation, or use manual anchor picking.
Pick a Hinge Anchor Manually
Use this workflow for a single door when the automatic edge is not suitable:
- Select or list exactly one door.
- Assign Joint Data.
- Click Pick Anchor / AttachmentPoint In Scene.
- Left-click the intended hinge position on the door mesh or collider in the Scene view.
- Press
Escor right-click to cancel anchor picking.
After a successful pick, the tool immediately configures the door and selects the generated attachment-point object.
Generate Door Attachments Automatically
- Add one or more door objects.
- Assign Joint Data.
- Choose Left, Right, or Auto Closest Building.
- Click Generate Door Attachments.
- Check the processed and skipped counts shown at the bottom of the window.
For every successfully processed door, the generator:
- changes the object to D WeakPin;
- creates or reuses
DoorHinge_AttachmentPoint; - places the attachment point at the selected hinge edge and halfway up the solid voxel bounds;
- adds or reuses
EntityDestructibleItemandRigidbodyProxy; - connects the attachment point and selected joint data to the door entity.
Generating again updates the existing door hinge attachment instead of intentionally creating a new hinge each time.
6. Recommended Scene Workflow
- Split the MagicaVoxel World scene into uniquely named A/B/C/D objects.
- Convert the
.voxfile as Scene with Assets Processor. - Open the generated prefab and verify object placement.
- Use Type Switch to correct any misclassified objects.
- Adjust C supports and D attachment points.
- Use Door Generator for hinged doors.
- Save and apply prefab changes.
- Add the scene prefab to the mod manifest.
- Export the mod and test static geometry, dynamic props, destruction, supports, attachments, and doors in the game.
Troubleshooting
The selected object does not appear in the tool
Select the generated voxel object or one of its children. The object must belong to a VoxelObjectProxy, and a project asset that is not open in a scene or Prefab Stage cannot be used as a current scene selection.
A C object falls immediately
Check that its UnyieldingArea overlaps the intended A-type ground or foundation. Also confirm that the supporting object is configured as Building-layer static geometry.
A D object does not attach where expected
Move its attachment point to the correct solid face or use Snap To Wall. Verify the yellow attachment arrow and confirm that the supporting voxel object is close enough.
Pick Anchor misses the door
Click directly on the door's visible mesh or collider. If picking remains difficult, use automatic generation first and then reposition the generated DoorHinge_AttachmentPoint.
Auto Closest Building chooses the wrong side
The tool chooses the hinge candidate nearest to an A-type, Building-layer, or EntityBuilding voxel object. Remove unrelated nearby building geometry from the comparison area, choose Left or Right explicitly, or pick the anchor manually.